Hi everyone, my name is Takahiro Yasuda and I worked on Bayonetta 3 as the Lead VFX Artist. I want to take this opportunity to showcase a few tidbits on how we went about creating some of the game’s VFX (short for “visual effects”).
We referenced commercials for cosmetics and shampoos when coming up for the imagery for the VFX in the game. We were inspired by the tiny little sparkling particles and how they exude femininity. For the Witch Time and Demon Masquerade effects, we took on the challenge of generating something grander and somewhat more mature than what we saw in the previous games.
Sparkling crystals and particle expressions
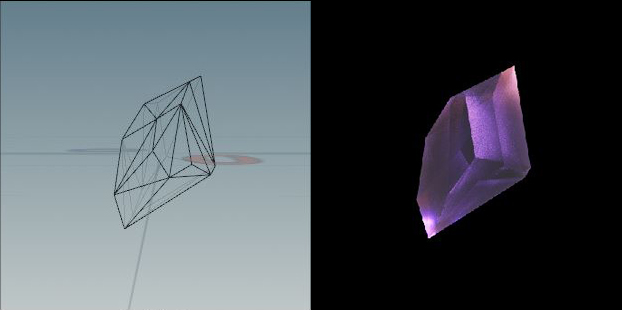
The first thing I want to introduce is the sparkle we used to give off a slightly more mature feel. The image below shows a crystal model created in Houdini(*1) and colored with lights. The model is animated to rotate, and the color of the light makes the material sparkle and change color in a complex way, creating a comparatively robust effect.
(*1) Houdini: Software for 3D animation production.
Here is a scene where we used crystal-like materials.
Cutscene in the Prologue chapter where you get the Color My World guns
You’ll find the scattering of crystal particles happens as part of the Witch Time visuals. Triggering Witch Time generates particles and lines from both sides of the screen. This looks really cool, albeit only lasting for a brief moment.
Witch Time VFX
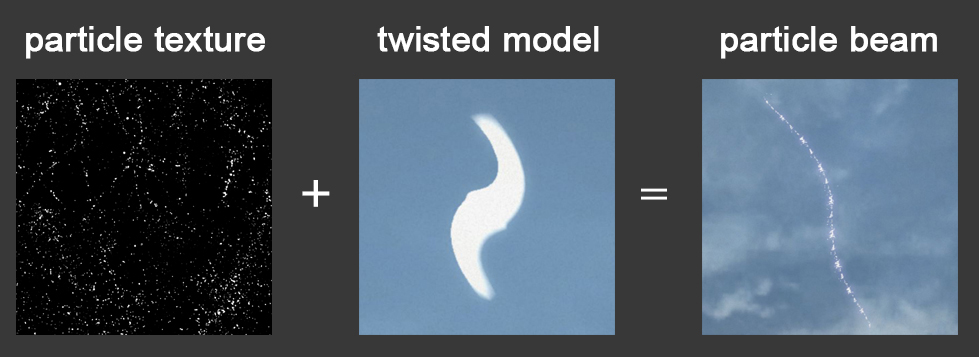
Below is a particle beam created by pasting a fine particle texture onto a model. Instead of simply creating many dots, a fine particle texture is created in advance and applied to the model. The model’s rotating animation and the texture’s UV scrolling(*2) are used to create complex particle movements.
(*2) UV scroll: When a single texture moves up, down, left, and right.
Demon Masquerade cutscene in the Prologue chapter
Destruction Visuals
Many of the environments in Bayonetta 3 appear destroyed as a result of the Homunculus invasion. In addition, some areas are destroyed in real time during battles and in the cutscenes. We challenged the limits of processing load through trial and error to see how much we could show destroyed cityscapes in the game and how much we could create flashy destruction effects. Here are some of the things we did!
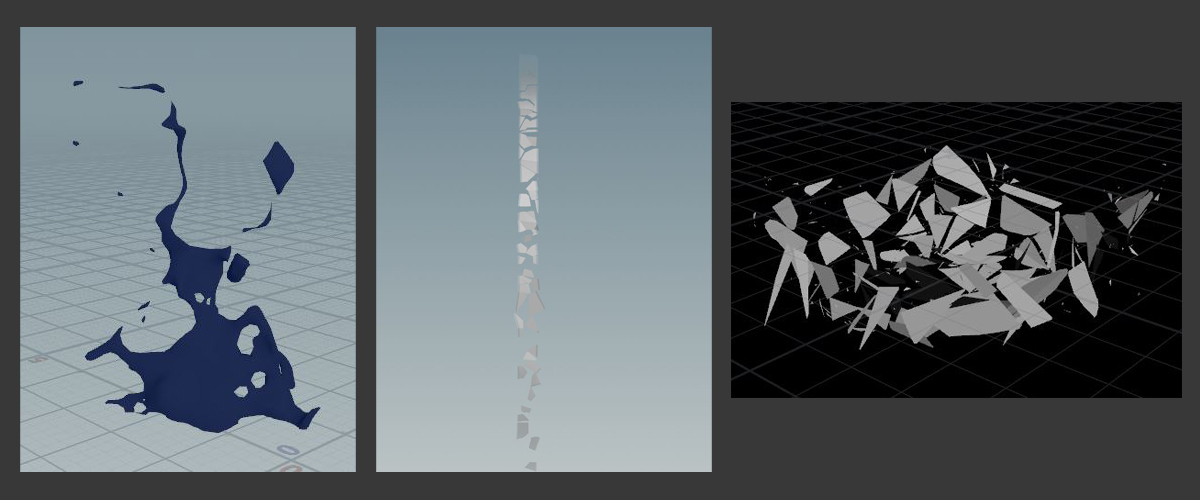
When a building gets destroyed, we needed to generate a great deal of rubble and glass shards. Doing this in a traditional way would have led to an increase in the number of debris models, which in turn would increase the polygon count and make it more difficult to process. As a workaround, we decided to produce many textures of the rubble and shards instead of using actual polygon models for these particles. Producing such a large number of these rubble textures required us to create multiple textures with different silhouettes so they would not all appear with the same silhouette.
 Rubble and glass textures
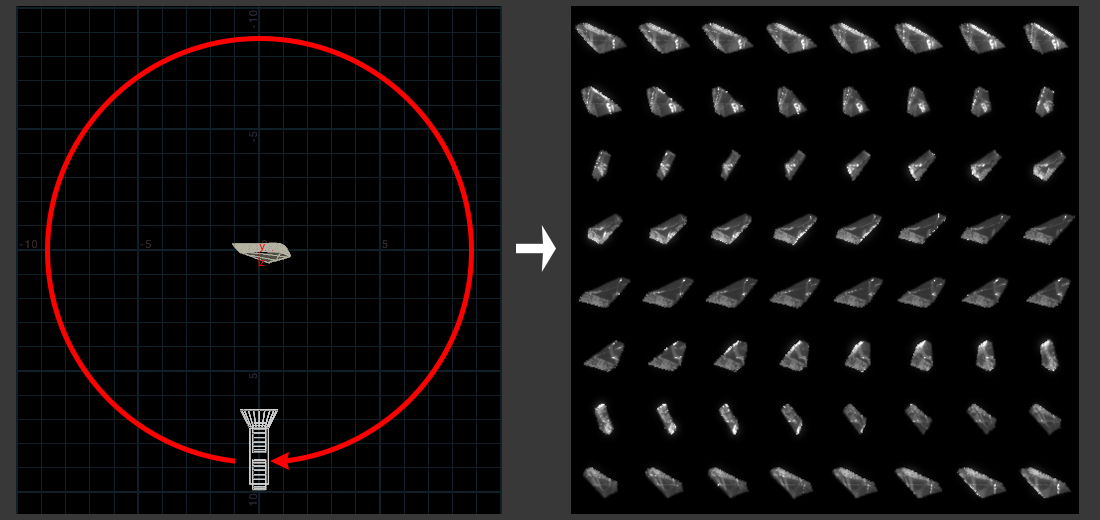
This time we experimented with Houdini’s Impostor feature, which allows you to create textures to make an object appear 3D. We captured an object in a 360-degree Y-axis setting and created a texture sheet of glass shards. Although this was not an actual 3D model, we created a three-dimensional texture and randomly selected materials for the texture sheet to make the silhouette look different and stand out.
Next, using the above materials, we tested the destruction of these materials using GPU particles, which is a feature that displays a large number of textures at once, so we were able to produce a lot of debris with a low load. We also added light source calculation to the settings so that the particles would be affected by point lights. In the video below, an orange point light is placed in the center, so glass shards that enter the light’s range are affected and give off an orange hue. The VFX of the explosion is set up so that the shards are affected by the light and fly apart, which I think makes the effect a lot more realistic.
Testing in Imposter
An example of how we used glass shard materials and applied them can be seen in the train battle, as there are heaps of broken windows and glass shards scattered across the floor. The destruction of buildings was built with rubble and wood made using Impostor and GPU particles to make their destruction very dynamic.
On-train battle
Smoke and Haze
Here is how we used 3D textures with a file format for volumetric data known as VDB. We created and then output a VDB material with noise, etc. from a cube in Houdini, and created a 3D texture. We then converted the 3D texture to HDA(*3) and gave it all the necessary parameters so that it could be adjusted later.
(*3) (Houdini Digital Assets (HDAs): A networks of nodes that can be packaged up to simplify commonly used tasks in Houdini or to create tools that can be used in external software. – from houdinikitchen.net)

We then used the resulting 3D texture material in the engine to set the shape, amount of tiling(*4), UV scrolling speed, color, and alpha. We adjusted the VDB to produce smoke and other haze-like effects and placed these in each level. We covered the Shibuya level in a haze of smoke to accentuate the atmosphere.
(*4) Tiling: The same texture is repeatedly laid out in a tile-like style.
Testing smoke
Sea of Clouds
Sea of Clouds
This level featured a battle set within a sea of clouds reminiscent of a bubble bath, so we needed to create an extensive cloud cover with a low rendering load.
Tweaking the clouds
Since the number of polygons would increase if we were to create all models with the same density, we divided the model into near, middle, and far views and applied polygon reduction to each part accordingly. Another reason for dividing the model was to create a sense of perspective by making the inside of the model move faster and the outside move slower.
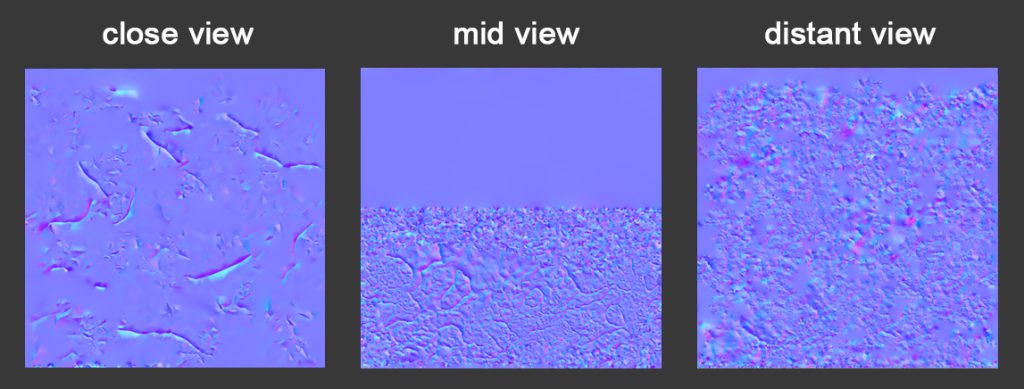
As with the models, we created the Normal Texture(*5) separately for the near, middle, and far views. We applied the Normal Texture to each model to express the shading of the clouds. Also, by scrolling the UV slowly, we were able to express the clouds as if they were flowing in the wind.
(*5) Normal Texture: Also known as normal mapping and Dot3 bump mapping. A special texture mapping technique that adds the bumps and dents to a model with fake lighting.
Expressing the collapse of portals
We used Houdini’s VAT(*6) to generate various effects in the game, and below is a sample of a VAT that we applied to a collapsing portal.
(*6) VAT: Abbreviation of “Vertex Animation Texture”. A texture that records the position and rotation of vertices.
A portal collapses each time a level is cleared in Bayonetta 3. I created a simulation in Houdini that shows the gradual collapse of the portal from the bottom and animated the falling debris to gradually decrease in scale and disappear. Based on this simulation, we added the GPU particle shards of glass and other objects as explained above to create the effect of the shards collapsing and breaking into pieces.
Collapsing portal
I hope you enjoyed this entry. I could talk for so much longer about many of the other VFX techniques we used in Bayonetta 3. We went through a lot of verification and testing for these VFX techniques, while paying close attention to every detail in creating the VFX for the game. I think we were able to create an experience that is overwhelmingly powerful and exhilarating, and that tests the processing load of the hardware to its limit. A year has already passed since the release of Bayonetta 3, and I am sure many of you have picked up the game and played it already. If you have a chance to go hands-on with Bayonetta 3 again, make sure you check out some of the areas I wrote about in this entry!
 |
Takahiro Yasuda Joined PlatinumGames in 2010 as a VFX Artist and has created VFX for over 10 of their titles. He was the Lead VFX Artist for Bayonetta 3. |