Hello, everyone!
This is Nakao, Producer/Director of NINJA GAIDEN 4.
It’s been a little while since release. I hope you’re all enjoying it! This time, in what we’ll call a “strategy guide,” I’d like to talk about some of the combat techniques available to Yakumo and Ryu. I’ll cover everything from the basics to advanced techniques, with plenty of meaty details…!
Dismemberment Rate
You’ll need to dismember enemies to activate the powerful “Obliteration” technique, and the chance to dismember varies depending on the move. Each skill’s approximate dismemberment rate is displayed in Training mode, so hopefully it’ll be a good reference.
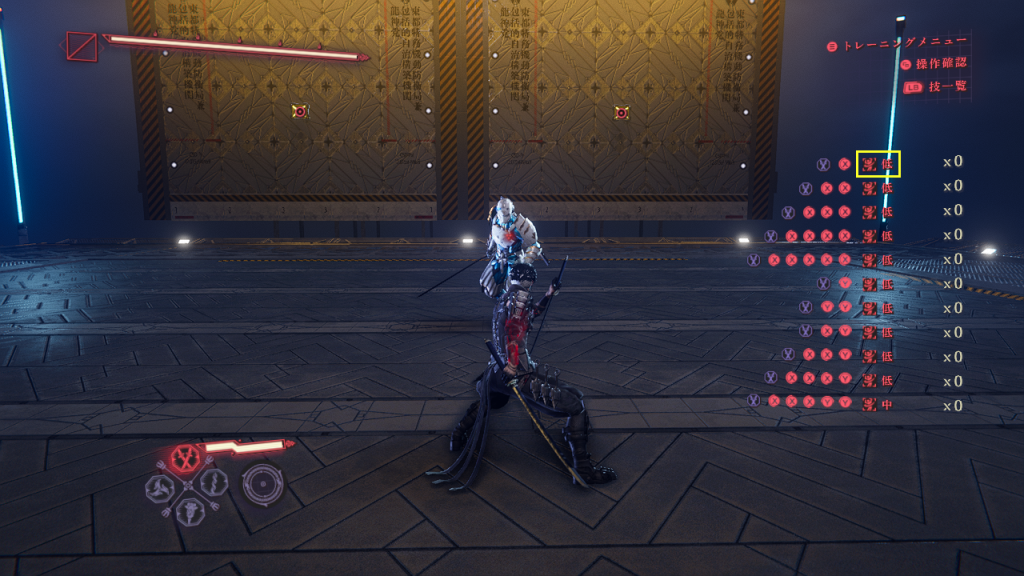
This gives a rough idea of whether the dismemberment rate for a technique is high or low.
Gauge Consumption and Dismemberment Rates for Bloodraven/Gleam Form
The Bloodraven Form and Gleam Form were introduced in this title, and the various combos in these forms using X and Y become more powerful and efficient later in the combo.
Specifically:
– Dismemberment rates and damage increase as combos approach the third stage
– Bloodbind/Ki Gauge consumption decreases as combos approaches the third stage
This results in attacks that are both more powerful and consume less resources. Yakumo’s weapon-specific actions like Charge Attack and Drill Attack, activated by holding buttons, have further increased damage and dismemberment rates at the third stage.
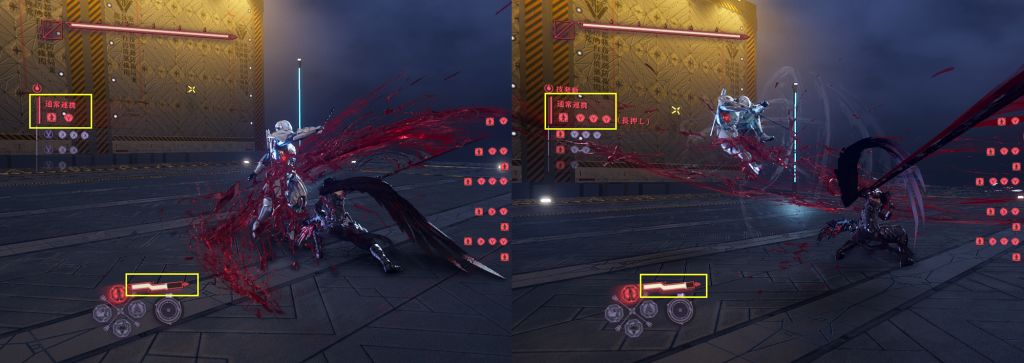
Comparing the Y-combo of Takeminakata, it consumes about half as much at the third stage
All that said, executing the third hit during high-speed combat is difficult! I recommend these techniques:
1. Shorten combo time by not performing weapon-specific actions until after the second hit of a combo
Weapon-specific actions are powerful but have long attack times, leaving you wide open. Conversely, skipping them shortens combo time. To connect to the third hit of the combo chain sooner, deliberately skipping the unique action and using X->X->HOLD X or Y->Y-> HOLD Y will allow you to quickly execute powerful techniques.
Combo with X->X->HOLD X. Connects relatively quickly and is powerful due to the Charge Attack on the third hit.
2. Using “Chain Link” to chain from Base Form to Bloodraven Form
The combat skill “Chain Link” obtained from Tyran allows you to maintain a combo between Base Form and Bloodraven Form (e.g. Base XX → Bloodraven XXX, Bloodraven XX → Base XXY, etc.). Using this effectively will allow you to quickly connect to the latter half of a combo.
After Base Form Y->Y, Chain Link into Bloodraven Form YYY. Though difficult, this is a highly gauge-efficient technique.
Use these to gain a greater advantage in battle!
Staggering Enemies
Countering an enemy’s Power Attack with a Bloodraven Form attack leaves them vulnerable, and tough enemies like bosses will flinch against your attacks for a short while. The closer to the instant before their Power Attack activates, the longer this state of vulnerability lasts. Also, the duration of this “vulnerable state” is additionally affected by the technique you use in the counterattack. Each technique has its own precise settings, so we can’t reveal them all here, but here’s a little hint:
The later in a combo, the longer an enemy’s vulnerability after being staggered
Close-range attacks cause longer vulnerability than long-range attacks
In other words, even when it comes to staggering enemies, higher risk means a greater reward.
Left shows a stagger with Takeminakata’s B, right shows a stagger with XXX. With XXX, the vulnerable state persists until Base Form XXXXX is performed.
Counterattack opportunities vary per technique like this, so be sure to try them out.
Perfect Fatal Flash
If a Fatal Flash is input at the exact right timing, it becomes a “Perfect Fatal Flash,” guaranteeing dismemberment on the enemy. Perfect Fatal Flash in Base Form only causes dismemberment on the enemy you parried, while a Perfect Fatal Flash (Bloodraven Form) can cause dismemberment on all enemies hit by the attack. This consumes the Bloodbind Gauge, but it’s extremely effective against large groups of enemies, so definitely give it a try.
By the way, the window for triggering parry states and the attack range of the Fatal Flash differ by weapon. The wider-range Takeminakata has a slightly stricter parry window.
Ultimate Technique
As in previous titles, the Ultimate Technique remains a powerful and crucial action in NINJA GAIDEN 4, but in this game, some enemies can block it. However, performing “Ultimate Guidance” will prevent enemies from blocking it. Ultimate Guidance instantly advances the charge level, so I highly recommend always using Ultimate Guidance to activate your Ultimate Techniques. However, be aware that during certain enemy transformations (like bosses), even Ultimate Guidance will be deflected.
The video shows this against a boss, but Ultimate Guidance is also effective against regular enemies that guard against the Ultimate Technique.
Techniques that can be chained with Flying Swallow
“Flying Swallow” causes you to dash toward an enemy and has a low chance of decapitating it, but it can also be used to cancel various other combos. I’ll introduce some of these cancelable moves.
– Shared
Wind Run -> Flying Swallow
Wind Path -> Flying Swallow
Shadowless Footsteps -> Jump -> Flying Swallow
– Takeminakata
XXY -> Flying Swallow
*For PS5: □□△
– Yatousen
↓↑X->Flying Swallow
*On PS5: ↓↑□
– Ryu Hayabusa
XYXXY/XXY midair->Flying Swallow
*□△□□△/□□△ midair for PS5
And so on… There are others too, so be sure to explore them.
Nakao’s Recommended Moves
Finally, here are some techniques I recommend to everyone.
– Takeminakata
Bloodraven Form, Full Rotation→HOLD Y
*On PS5: Full Rotation→HOLD △
This move has a chance to decapitate enemies. Holding the button leaves you vulnerable, but its wide range makes it good for slicing off multiple heads at once.
Its base dismemberment rate is high, so I recommend it for chaotic battles.
– Yatousen
Base Form XXXY
*On PS5: □□□△
In this combo, tilt the stick left or right when activating the move to change your movement direction. Use this for emergency dodges from enemy attacks.
A technique also usable for evasion. Can be used differently for left/right and front attacks.
– Magatsuhi
Base Form XY
*□△ on PS5
Unusual for this weapon, this is a single-hit move, but in exchange, its dismemberment rate is particularly high when compared to other moves with this weapon. When you’ve decreased the number of enemies, use this combo before finishing them off with an Obliteration for safer combat.
It feels similar to the powerful Lunar Staff “XXY” from previous games.
– Kage-Hiruko
Bloodraven Form, RB+A
*On PS5: R1+X
This weapon lets you leap over small enemies with the above command, putting you behind enemies instantly. Furthermore, unlike Wind Run, it can cancel enemy Power Attacks. Mastering this makes it a highly useful technique.
It won’t work on medium-sized or tough enemies, but against viable targets, it can nullify everything including Power Attacks.
– Ryu Hayabusa
Gleam Form, Full Rotation→X
*On PS5: Full Rotation→□
Attacks around the hit enemy with Follow-up Attacks. Ryu doesn’t have many attacks with a wide range, so this is extremely useful.
Since Ryu generally has a short attack range, incorporating this technique makes multi-enemy fights smoother.
Forward Perfect Reverse Wind
When Ryu Hayabusa performs a Perfect Reverse Wind Technique while the stick is tilted forward, Cicada Surge activates, allowing him to move behind an enemy. Unlike Yakumo, this can be activated even while airborne. It’s useful when facing long-range attacks while falling.
This is how it looks when activated midair. Ryu’s forward Perfect Reverse Wind is the only one that lets you get behind enemies from a bit of a distance.
Thank you for reading this loooong post all the way through! This time I focused on player-related topics, but I plan to release an enemy edition soon. Stay tuned.
See you next time!
 |
Yuji Nakao After working on several character copyrighted games as a director at his previous company, he joined PlatinumGames and worked as producer on “The Wonderful 101: Remastered,” PlatinumGames’ first in-house published title, and co-producer of “SOL CRESTA.” He oversaw the entire production of “BAYONETTA 3” as producer, and for his latest title, “NINJA GAIDEN 4,” he was appointed as both producer and director. In addition to managing projects and serving as an internal leader, he also makes efforts to nurture the next generation of developers. |